Setup email forwarding in cPanel.

Setting up email forwarding in cPanel couldn’t be easier.

1. Log into your cPanel hosting account via the link provided by your hosting company. (if you don’t currently have cPanel hosting you can find out more here)

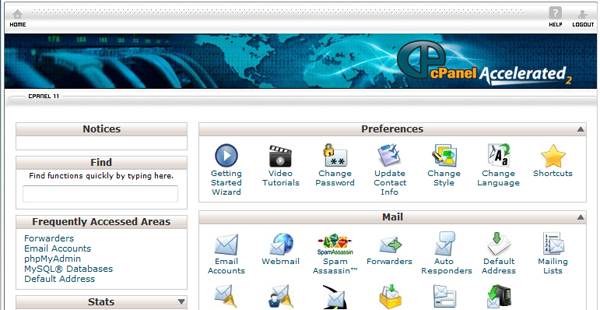
2. You should be looking at something like :-

3. Select “Forwarders”

4. On the next screen select the button called “Add Forwarder”

5. The next screen is the email forwarder screen, enter the requested details (i.e Email address, destination address) and click “add forwarder”

And that’s it! Your email forwarder has been set up successfully. You can test it immediately by sending a mail to the forwarding email address that you have just set up.

What are email address forwarders used for?

One of the main uses for an email forwarder is if you are a small company with a few email addresses like ‘sales@’, ‘info@’, ‘support@’, rather than having 3 separate email accounts you could set up one pop mail account for ‘info@’ and then set the other two mail accounts up as forwarders to send their mail into the info account.

This save’s the hassle of checking 3 separate email accounts individually. The only drawback is that when replying to these emails the response will come from your info@ account.

How to set up an email address

This tutorial will be separated into the following two segments :

  • 1. How to set up your email address in your cPanel Hosting control panel (If you do not currently have a cPanel hosting account please view our cPanel hosting page for more information)
  • 2. How to setup your Outlook or Thunderbird to collect the mail


Outlook info
   download Thunderbird
If you don’t have Outlook already it can be bought here
Thunderbird is our recommended email client and can be downloaded free of charge here

1. Setting up your email account in cPanel

First of all, don’t panic! This is a really easy process and you do not need to be proficient in server administration to succeed!

a) Log in to your cPanel area (If you are unsure how to do this, consult the hosting account details that should of been sent to you by your hosting provider when you initially setup the account, or call your hosting provider.)

b) Once logged into your account you should be presented with a page that has options listed that look somewhat similar to the screenshot below :
cPanel Hosting Panel

Select the “Email Accounts” option in the “Mail” section.

c) On the next screen there are three options that must be completed.
1. Email : Add everything before the @ that you would like your email address to be (e.g info)
2. Password : This is a password specific for this email address alone.
3. Confirm Password : self explanatory.

Once completed click “Create Account” you should then see your new email account in the list.

And that’s it! Your email address is now set up on the server and is already receiving emails addressed to it.

2. Collecting your email in Outlook / Thunderbird

All mail accounts use the same information, but request it in different ways (Display wise). So below I will highlight the main settings, the rest are either not necessary to the workings of the mail client (such as the “Your Name” field) or I have overlooked them.

This tutorial makes a presumption that you know how to get in to your account settings to set up an account (hint : “Tools” menu if your unsure)

When setting up a new account; generally POP3 is all you will need, in another tutorial we will explore IMAP.

Important Settings :
E-mail Address – This should be set (obvious I suppose) to your full email address.
Password – This should be the specific password you set for this email account in cPanel.

Often mail software these days will attempt to set up the rest of the account for you. So below are the settings it should of preset for you.

Incoming Mail Server : mail.[your domain]
Outgoing Mail Server : mail.[your domain]
[your domain] will be the everything after the @ in your email address.

Username – Should be (in most cases) your full email address.

At this point you can test your account, receiving email should definitely be working. However, you may have trouble sending mail as some servers require authentication.

This option in Outlook is in the “More Settings” area of your settings page. Once the more settings window is open select “outgoing server” and tick “My server requires Authentication”

In Thunderbird this option can be found in the “Outgoing Server (SMTP)” option in the list of accounts on the left. “Connection Security” should be “None” and “Authentication Method” should be set to “Password, transmitted unsecurely” unless encryption is supported by your host of course.

Please feel free to post your questions / comments.
Why Host In the UK? Are there any benefits?

Web Hosting in the UK

So you have decided you need a hosting account, but wonder why get web hosting based in the UK?

Just to clarify first of all, when we say “web hosting in the UK” we don’t just mean a web hosting company in the UK but rather a hosting company in the UK that provides hosting on servers located in the UK.

Many companies offer hosting that is US based, as data transfer and datacenter rack space is cheaper than here in the UK. So is this a big deal or does it not really matter?

Below are some of the Pros and Cons that I believe are involved in hosting on servers based in the UK.

Something you would do well to consider, before selecting a hosting company is, what will your websites target audience will be? Is it going to be a worldwide venture or are your customers going to be from only one country source?

This is important because from an SEO perspective, Google ranks a UK hosted company website higher for UK searches, it makes sense really, UK based hosting, UK based searches, UK based company, they all match up, so it makes perfect sense to rank these websites higher on a google.co.uk search.

On this SEO note, not to get too side tracked, having a .co.uk domain name and also setting up Google’s webmaster tools and geo targetting your website can also assist you in getting better results on google.co.uk result pages.

A con would be; In the UK, as our transfer costs are higher this generally means the cost of hosting accounts in the UK tend to be higher.

Ping for Web Hosting in the UK

To counter this however, when you are hosting your website in the UK you will benefit from a higher ping rate. A ping is how long it takes for a packet of information to travel from your server to whomever asked for it. As a searcher clicks on your domain in Google, their ISP makes a request for the website, your server responds to this request and starts sending the data back to the user. We all know how frustrating slow websites are, minimise on this by hosting your website in the country your target audience lives.

As a final note, how frustrating is it to find an issue with your site, have a problem uploading your new web pages and then have to wait until noon or beyond for the US based support desk to be open. Hours of service can really make a big difference, even if you just want to make sure your registration has been received correctly, to be able to pick up the phone without having to think about time zones can’t be underestimated.

Domain Registration – Privacy Protection!

As a domain registration is processed, all of the clients details are sent to the registrar who set the client as the registrant for a particular domain name.

A side effect of this process is sometimes overlooked by the majority of domain registrants; all of your personal details become available to the public. It can even include your contact name and address!

This is usually the default with most registrars, but however there is privacy protection available. With all domains registered through GLX Web Hosting an option is presented to all registrants to hide their personal details.

This does not infringe on your ownership of the domain in anyway, it only provides a cover address and name for the public registrant details displayed on the whois.

Check the registrant information on google.com, this is publicly visible.
Google.com Whois Info

This is the same for all domain names ever registered. If you are sensitive about the information publicly available about you on the internet then select privacy protection and keep yourself anonymous!

Our website has been updated

We have just released our new website, we have gone for a new look and new navigation. Our aim is to make the products we have available easy to access. You may notice we also have a new domain and are also now offering a wider variety of products including a massive selection of international domain names we are also offering php hosting and cPanel hosting accounts and also MX Backup services. Your feedback on the new site is welcome.

Dedicated Servers

We are now offering customisable dedicated server options.

Dedicated Web Hosting gives you the flexibility to expand and change as your business requires. It can help with security if you are taking payments, handling the setup of personal accounts or high volumes of traffic.

Click the following link to view our dedicated server page.

Our basic dedicated hosting account starts from £125.40 per month, this provides you with the following :

Data Transfer – Monthly : 2000 GB
Hard Drives :1x 250GB 7200rpm SATA Hard Disk
Processor : Dual Core Xeon 2.33Ghz 4MB Processor
RAM : 2GB ECC Dual Channel RAM

If you need assistance choosing your dedicated server hosting please contact our support team for help and advice.

I need information on Perl

Perl is located at:

/usr/bin/perl

If you are getting 500 internal server errors, please firstly:

1. Check that the script has CHMOD 755.
2. Check that it was uploaded in ASCII mode.
3. Add the following line below /usr/bin/perl:
BEGIN { open (STDERR, “>cgierror.txt”); }
Check cgierror.txt for any errors that may occur.

If you require a module to be installed, please contact our support team.

How do I use MySQL databases?

Firstly, you will need a user to access this database.

Log into your cPanel (http://www.yourdomain/cpanel).

Then click “MySQL Databases”.
Scroll down until you see “Users”. Enter a username and
password below.
Note that the actual username will be you account name
followed by an underscore and the username you define.
E.g. If you account name was “hosting”, and your database
username was “fred”, then your full username would be
hosting_fred

After you have done this, find the text box which allows you
to create a database. Enter the database name, and press
Add Database.
Note that the same rules apply as for the username, your
database will be called accountname_databasename.

Then, you need to add the user to the database.
Select the user you created from the drop down box, then
select the database.
Make sure ‘ALL’ is ticked, and then press “Add User to DB”.

What are the email settings?

Quick Reference:

POP3: mail.yourdomain.com
SMTP: mail.yourdomain.com
IMAP: mail.yourdomain.com

Username: full email address
Password: your password

Our SMTP (outgoing) server will require authentication with the same credentials as you used to login.

Outlook Express:

Tools > Accounts > Add Mail
Follow the instructions.

To enable authentication on outgoing emails:
Tools > Accounts > Properties > Servers > Tick my server requires authentication.

I think my ISP is blocking my outgoing emails.

If you are able to connect to our POP3 server, but not to our SMTP server, it is likely that your ISP is blocking you.
Many ISPs will block you from sending out emails using a different SMTP server than their own on port 25.

Therefore, all customers may use port 26 to send outgoing emails if they need to.

To change this you need to access your account settings in your email software.

Outlook Express:
Tools > Accounts > Properties (on your account) > Advanced.
Change Outgoing port to 26.

Thunderbird:

Tools (Edit under linux) > Account Settings > Outgoing Server (SMTP) > Edit
Change port to 26.

windows logo php logo MySQL logo asp logo perl logo dot net logo helm logo xen logo hyper V logo apache logo comodo logo worldpay logo dell logo